Administrators guide
Table of content
- Users
- Add User
- Edit user
- User Roles
- Change user password
- Add/edit scene
- Add/edit price template
- Add/edit discount template
- Add/edit ticket template
- Personal data
- Change password
- Actors
- Schedule
- Reports
- Stage plays
- Reservations
Users
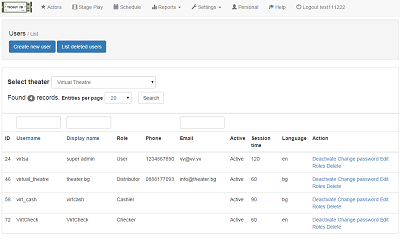
As a system administrator you are responsible for the creation, empowerment and control of all users. List of all registerred users can be viewed by choosing Settings -> Users. The list can be filtered by username and display name (partial match) and email (full match). You can also sort the list alphabetical by username or display name.
To the right of each user in the list you can see the operations that you can perform with it, such as activate or deactivate, and also you can delete it when he will no longer use the system. Possible other operations are editing information about it, changing the rights and main role (not desirable for the already active users) and reseting his password (to enter a new password).
For each user in the list you can find the following information: ID, Username, Display Name (usually real name, which all other users see), Role, Telephone, Email, Status, Session Time and Language.
Add User

To create a new user you must select Settings -> Users. At the top of the page, click the button "Create New User". This will open a form to create a new user.
The fields you have to fill are: "Username" - username that will be used for logging into the system; "Display name" - the name that all other users of the system see, usually the real name and surname; "Email" and "Phone" fields are optional, but it is nice to enter as much information that will be useful; "Session time" - minutes of inactivity by the user, after which the system will require re-logging in; Select a language for the user from the list; Enter the password for the user (twice) and recommend the person to change the password immediately after his first login. The password must meet following conditions - to be at least 6 characters long and contain at least one small and one capital letter as well as at least one number.
IMPORTANT: After creating each user by default he has the lowest level of permissions and main role of "User". After creating you must click on the link "Roles" of the new user and select the main role for his account, namely: "Admin", "Distributor", "Accountant", "Cashier", "Director", "Checker" or "Producer". Only for special cases role "User" can be left. It should be noted that the main role defines fundamental permissions for the system resources and not the administrative position of the person in the organization. After the initial selection of the main role we do NOT RECOMMENDED subsequent change, although the system allows it and is technically possible. It is good practice to create a new username if the same person is changing his position and responsibilties in the organization.
Edit user
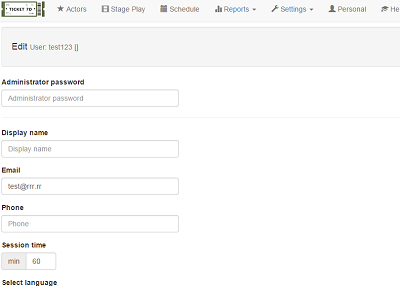
To edit information about an user you need to find it in the list and click on "Edit"
The fields that you can change are: "Display name", "Email", "Phone", "Session time", "Language", after applying the changes, enter your own administrator password at the top of the form and click the button "Change". Fields must comply with the same conditions as the registration of a new user. "Email" and "Phone" are optional.
User Roles
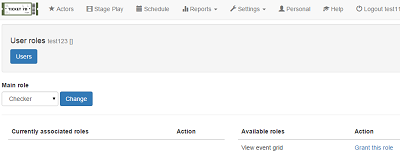
Basic permissions for each user are determined by the main role that can be "Admin", "Distributor", "Accountant", "Cashier", "Director", "Checker", "Producer" or "User". This main role can be changed at any time, but not recommended, a better practice is to create a new user, if needed.
Each main role has a specific additional permissions which may be at anytime associated or removed (eg acceptance of credit card payments or the right to issue invitations).
To change user main role or specific permissions, select "Roles" to the desired user from the list.
Change user password
Each user can change his password and personal data by himself in the system, but in the case when the current password is forgotten and the user has no access to the system, he should seek the assistance of the administrator. The administrator can change the password of any user.
For this purpose, from the list of users click on "Change Password" of the desired account. In the form that opens you have to enter your current password in the top field, then twice the new password. Click the "Change" button.
Always recommend users to change their password immediately after successful login.
Add/edit scene

To work with the scenes you must select Settings -> Scenes. This displays a list of all defined scenes containing full name, number of seats, availability of sectors, grid X and Y. From here you can delete a scene or change it by clicking "Edit".
To create a new scene click on the button at the top of the page "Create new scene". In the form to create there are the following fields: "Name" - this is the name that will appear on the tickets of the performances that are played on this stage/scene. Field is not unique and you can create a lot of scenes with the same name - practically representing different configurations of the same real scene. To be able to distinguish diversities configurations available there is second field "Name suffix" that is visible only within the system. The third field defines the existence of sectors or not (this value determines whether the value sector will be displayed on the ticket). Notwithstanding this value each scene consists of a grid of multiple sectors. The X and Y parameters of this grid are given in the last two fields. After entering the required information, click the button "Register".
Each scene has a grid of sectors. To see the grid of a scene, click on the "Grid". You will see a list of all registered sectors of the selected scene, and their arrangement within the grid below. Each sector can be associated only with one position on the grid or may not be associated with any position (then this sector will be ignored by the system). To reposition the grid make the appropriate choice from the dropdown menu and click "Save". It is possible to register and assign to the grid empty sectors (eg sector "scene", which practically visualize the physical positioning of the stage scene in the hall, with no seats).
The list of sectors contain the following information: ID, Name, Row num, Row Grid, Seats, Grid X and Grid Y. To register a new sector click on the button at the top "Create new sector". In the registration form you must enter "Name" - will be shown on the ticket, if the scene has selected "with sectors" option. The name is not unique, so you can create more than one sector with the same name (can practically divide the real sectors of the subsectors of the same name). The field "Name Suffix" is displayed only inside the system and can be used to distinguish the sectors with the same name. There are two different types of sector "with seats (numbered)" and "without seats". For sectors of type "with seats" you should leave 0 in the "Seats" as the system calculates them automatically, select YES or NO in the "Row num" determines whether each row number is displaid on the scheme on each line left and right, and enter values for X and Y of the seats grid. For sectors of type "without seats" enter the number of seats for the sector in the "Seats" field, choose NOT to "Row num", and leave 0 in the fields X and Y for the grid. Finally, click on the button "Register".
After registration of sector of type "with seats" it is necessary to click on the "Grid" and define the actual scheme of the seats on the grid with their "Seat number", "Line number" and "Type of seat". If you want a position in the grid to remain empty, you must set the value dash (-) for the seat number for this seat position. After you define all seat places click "Save" button.
You can not change the definitions of a scene if it is associated with a future event in the schedule, which has already sold tickets, because this can lead to conflict with the already sold tickets.
Add/edit price template
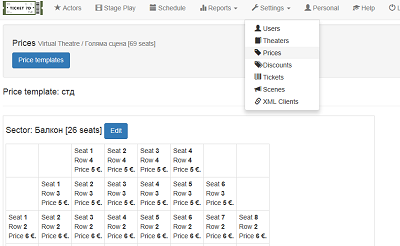
Each created scene must have at least one price template so it can be used. To work with price templates you must select Settings -> Prices. This displays a list of all defined price templates containing ID, Scene and Name. From here you can delete a template or change its name or edit prices. You can filter the list by scene or name, and sort them by name.
To define specific prices for a template, click on "Prices" for the template. This will open a general scheme for all sectors of the scene showing the current prices for each seat. To change the prices of a sector seats, click the "Change" button for the selected sector. After making the desired adjustments, click "Save".
Using a small number of price templates will make your live easier, yet the number of templates that you can create is unlimited.
Add/edit discount template
Each organization must have at least one discount template. To work with discount templates you must select Settings -> Discounts. This displays a list of all defined discount templates containing ID and name. From here you can delete a template or change its name. You can filter the list by name, and sort them by name.
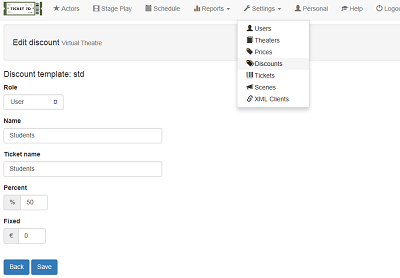
To define a specific discount for a template, click on "Discounts" for the template. This displays a list of all defined discounts for the template containing the following information: ID, Name, Ticket Name, Role, Percent and Fixed. Each discount can be changed or deleted. To add a new discount click on the "Create new discount" button. "Name" field contains a value that will be visible only inside the system, and the field "Ticket name" contains a value that will be printed on the ticket (for example, "social"), the field is optional and is not unique. You can define a variety of discounts, which are displayed in the same way on the ticket. Drop box "Role" determines which users of the system will have the right to give this discount, access levels are "User" - available to everyone, "Discount plus", "Discounts extra ','Discounts pass" - the highest level inherits all other previous. The two values for each discount are "percent" and "fixed" corrections accordingly regular price of a seat / ticket.
To define a discount if a type "Fixed price", independent of the regular ticket price you must set value 100% and negative value of the desired value in the "Fixed". For example, if you want a fixed price discount type 10 lev, regardless of the regular ticket price, you must enter 100 in the "Percent" and -10 in the "Fixed".
Add/edit ticket template
Each stage organization must have at least one ticket template. To work with ticket templates you must select Settings -> Tickets. This displays a list of all defined ticket templates containing ID and name. From here you can delete a template or change its name. You can filter the list by name, and sort them by name.
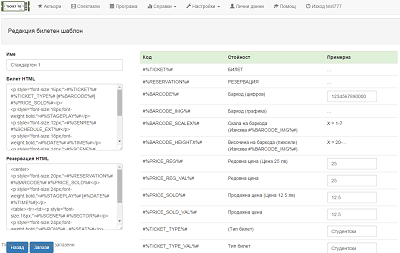
To define specific ticket codes for a given template, click "Edit" for the template. Besides the template name you can change two fields "Ticket HTML" and "Reservation HTML", respectively used for printing the ticket and reservation. Both fields essentially containing HTML code and editing them require knowledge of the language. Besides plain HTML there are coded values in the actual printing of the ticket / reservation , replaced with specific values for each ticket (barcodes, prices, seat numbers etc.). The right column gives you a complete list of all possible encoded values that can be used.
After making changes you can test the result by clicking "Test Ticket" and "Test Reservation" buttons. After reaching the desired results, click the "Save" button to save the new values. It's not recommended to edit templates associated with the upcoming events of the program, which can be performed sale at that moment. Best practice is to create a new template on which to copy the values from the old to make any adjustments to test and save the new values and only then by editing the schedule to change the current ticket template with the new.
Personal data
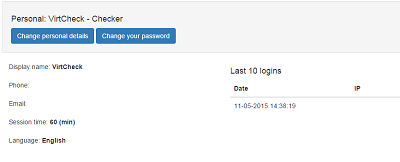
After a successful login, the user is redirected on the "Personal Data" page. You can go to this page once you click the "Personal" link on the main menu.
First on the page you can see your username and key role of your account. Then there are two button "Change personal details" and "Change your password". The first can edit your personal information, and the second is for changing your password. The information you see below is in two columns on the left are displayed personal data: display name, phone, email, sessioсъмнителнаn time and language. Display name is what all other users on the system see for you, unlike your username which is used for login only and not visible to others. From a security perspective it is well your username and display name to be different, for example in display name, you can fill your real name and surname. Your username can not be changed unlike display name. Eligible are all symbols letters and numbers. Phone and e-mail fields are optional, but having in mind that the system is for internal use only and there is no access to this information from outside, it is always good to keep updated information on those contacts. Session time value is reflecting the time in minutes of your session (after how many minutes of inactivity the system should log you out). Values are from 10 minutes to several hours. From a security perspective, it is good to avoid introducing too big value. And the language, shows the selected language.
In the right column you can find information about your last 10 successful logins into the system - time and IP. The information may be useful in detecting any undesired intrusion into your account. If you notice any suspicious information there (strange time or unusual IP address) contact us.
Change password
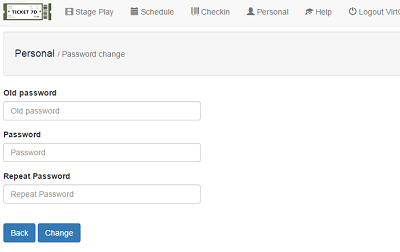
To change your password you need to select from the main menu "Personal" and then click "Change your password". You must enter your current password, followed by twice enter the new password, respectively, in the fields "Password" and "Password again" and then click "Change". The password has the following requirements: it must be at least 6 characters long, contain at least one little and at least one large letter and at least one digit. In case you forgot your current password and you have no access to your account, you have to contact the system administrator for your organization. He can reset your password.
Actors
During the creation each stage organization has been associated with a defined list of shared actors playing in the performances presented. Each actor can be associated with a show presented by the organization. When planning an event in the schedule, all actors of the show are automatically associated with this event. After that new actors can be added or removed only to/from this specific event (visiting actors, etc.) or (absent due to illness or other).
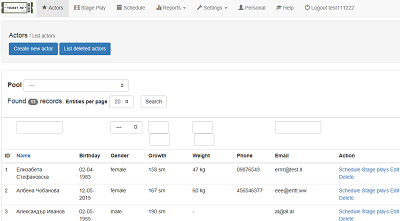
In order to add/edit actors click on "Actors" from the main menu. You'll see a list of all actors from the shared list for your organization, containing the following information: ID, Name, Date of Birth, Gender, Height, Weight, Phone, Email. You can filter the list by name (partial match), gender, height, weight and email (complete coincidence). You can sort the list by name.
To add actor click on the "Create new actor" button. In the registration form the only required field is the name.
For every actor from the list you can perform the following actions: Delete - it is not possible to delete an actor who is associated with the upcoming performance of any organization from the share actor list; Edit - you can edit all the information, add or delete photos; To check in which performances the actor is associated with a major or minor role - click "Stage Plays"; To check in which events took part actor for a predefined period of time (max 3m.) - Click on "Schedule".
Schedule
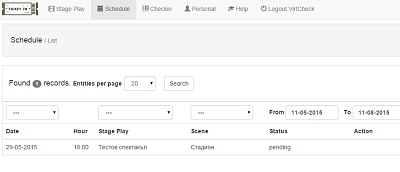
To add/edit the schedule of events/performances put in your stage organization you must choose from the main menu "Schedule" and you will see a list of all events for a specific period of time, sorted by date. Default selected period is 3 months (maximum) starting with the current date, virtually visualize all upcoming events. Clicking on any of the events you will go to the detailed scheme of the scene for the selected event.
The list can be filtered by date, stage play and scene. You can check all events to date X by simply selecting the date in corresponding drop box and click "Search". This will display all events for that date. Similarly, you can check when specific performance will take place - from the drop down menu choose demanded stage play/performance, click "Search" button and you will see all the dates on which this stage play/performance will play.
An event can be edited by clicking on "Edit". Subjects to change are: status (pending, locked, voided); Start of the event (event can not be moved back in time); Associated templates - price, discount, ticket; Also suffix and notes. You can change the actors associated to the main and secondary roles, these changes will only be valid for the specific event rather than the stage play as a whole.
You can delete an event from the schedule only if it has not already sold tickets. It is important to note that the list of upcoming events will be noted whether there is a conflict with other actors performing organizations shared your actor list - this can happen when there are scheduled events in more than one stage organization that engage the same actor at the same time.
Reports
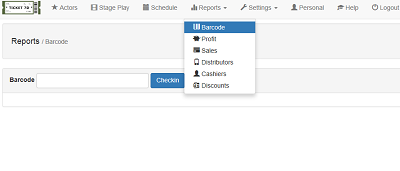
You can make various reports: "Barcode", "Profit", "Sales", "Distributors", "Cashiers" and "Discounts". For all of them is valid - once you have selected your desired exactly filters and period and have reviewed the report, you can export the report in PDF or CSV files for subsequent presentation, archiving or other further processing by other software. This can be done by clicking the appropriate button in the upper right corner (the buttons are visible only if there is information available for export).
By "Barcode Report" you can quickly and easily access the information for any barcode (reservation or sale). Barcode can be entered manually or via barcode reader (much faster and recommended). This option is used mainly for printing ticket search of a particular reservation or other records relating to the history of a particular ticket. The following information is displayed: Barcode (active link to detailed information) Stage Play (active link to the event), Scene, Sector, Price, Reservation (active link to the entire reservation, if available), Sale (active link to the whole sale if available), time of printing.
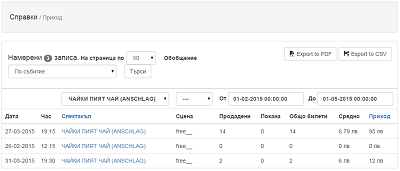
The second one "Profit Report" shows a list of information on events and revenue from each of them for a certain period of time. It displays information on the total revenue, total number of tickets sold, number of passes and the average ticket price for each event listed. Additional information can be systemized (summarizes) on event and on time of sale of tickets. Default selected period - the current month, but you can select any desired range (up to 3 months). There are filters by stage play and scene. Once you have selected all the desired criteria click "Search" button. The result can be sorted by revenue and stage play.
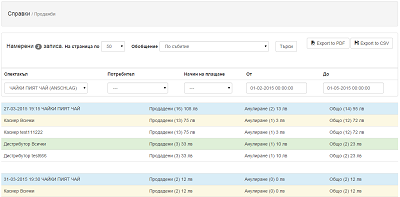
The third one "Report Sales" shows a list of events and information about the sales for each event of each customer / cashier / distributor, as well as total for cashiers and distributors for a certain period of time. Default selected period - the current month, but you can select any desired range (up to 3 months). There are filters on stage play, user and method of payment. Once you have selected all the desired criteria click "Search" button. Besides the list of all sales by users, this report allows you to aggregate information on search criteria. You can choose from the following summary: "On time of sale of tickets", "On Event", "On event/nominal" "On time of sale of tickets/nominal", "On event/all nominals" and "On time of sale/all nominals".
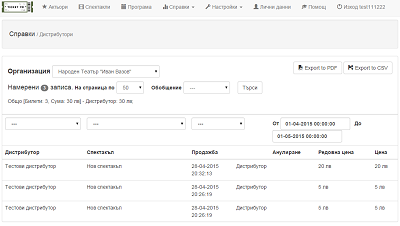
The fourth report "Report Distributors" shows a list of all tickets sold by distributors for a certain period of time. It displays information about the name of the distributor, stage play, time of sale and method of payment, time of cancellation and payment method, regular price and the actual price of the sale. The list can be filtered by distributor, stage play and payment method. Additional information can be systemized (summarized) by event. Default selected period - the current month, but you can select any desired range (up to 3 months).
Fifth one "Report Cashiers" is analogous to the previous one, but displays a list of all tickets sold by the cashiers for a certain period of time. It displays information about the name of the cashier, stage play, time of sale and method of payment, time of cancellation and payment method, regular price and the actual price of the sale. The list can be filtered by cashier, stage play and payment method. Additional information can be systemized (summarized) on nominals, on event and on event/nominals. Default selected period - current day, but you can select any desired range (up to 3 months).
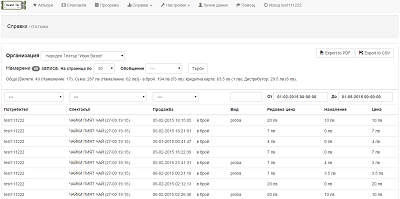
Sixth report "Report Discounts" shows a list of all tickets sold for a certain period of time. It displays information about username, stage play, sale and method of payment, discount type, regular price, net reduction and the final price for the customer. The list can be filtered by user, stage play, payment and discount (last for partial matching). Additional information can be systemized (summarized) by event. Default selected period - the current month, but you can select any desired range (up to 3 months).
Stage plays
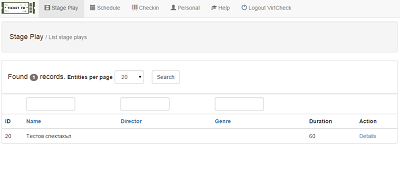
To add/edit the stage plays put in your organization, from the main menu click "Stage Play" , it will open a list of all placed in the theater stage plays, containing the following information: ID, Name, Director, Genre, Duration. You can also sort the list by name, director and genre (all in partial matching). The list can be sorted by name, director and genre. Clicking on "details" for selected performance can be viewed details like - the name, author, genre, director, actors - primary and secondary roles, timing, music, translation, photos and more.
To add a new stage play click the "Create new stage play" button. By registration form only required fields are Name and Duration (min). It is important to note that the name of the show is not subject to subsequent change. If over time the name changed, you have to create a new stage play with the new name. After creating a new stage play you can go to edit in order to add photos and associate actors.
All the information about a stage play can be edited with the exception of the name. You can add and remove photos. Associate and remove actors (primary and secondary roles) - please select / deselect from the list by holding down the keyboard button "Ctrl" (multi-select). It should be noted that the change in the associated actors (adding new or removing current) will only affect future events that are yet to be added in the schedule.
Each show can be deleted if it is not included in the schedule as a future event.
Reservations
To make a reservation click on "Schedule", select the event for which you want to make reservation and you'll see a general scheme of the scene. On each seat you can see the regular price, and when you hover the mouse above you can see row and seat number. Vacancies are not colored, sold are red and reserved are orange. If you click on any of the seats sold, the system will take you to detailed information about this seat. From here you can see when and who is reserved or when and by whom sold, whether the ticket is already printed and checked. You have fast connections for cancellation of tickets sold or cancellation / sale of reservation. Here you can find additional information on the ticket type and the selling price of the ticket and its barcode.
From a detailed scheme of the scene you can also see all sectors the total number of places, and how vacancies have each price category. You can also see the status of the selected event and you have few buttons at the top: "Schedule" - returns you to the schedule of all the events, "Show reservations" - shows a list of all reservations for the selected event, you can search for a specific reservation in many criteria; "Show sales" - shows a list of all sales for the selected event, you can search a particular sale on many criteria; "Show voided" - lists all voided tickets and reservations for the selected event, you can search the list by various criteria; " Show all "- displays a general list of all tickets for the selected event, which includes reservations, sales and voided. You can search for a specific ticket by multiple criteria.
To make a reservation click on the button "Go to grid" of your chosen sector. this will open a larger scheme only for the selected sector, on which seat you see the price and seat/row number. Again red colored seats are sold, and the orange - those are reserved. Here, however, they are not active and can not be clicked. Selecting the seats for reservation done by clicking on them and wait for them to change color to green. You can return back to the general scheme of the show from where to select another sector and continue to select seats. It is possible within a reservation to book seats from different sectors of the same event. If the selected sector has no seat numbers, there is only counter showing the number of elected seats and two arrows + and -. Select seats by clicking on the "+" button until the desired number of tickets. Select only one by one (you can not directly write 10 for example).
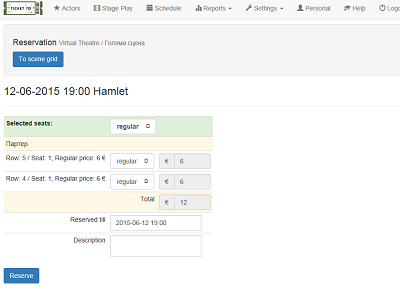
Once you have finalized the process of selecting seats you should click on the "Reserve" button. The system will transfer to the confirmation page of the reservation - this displays the name and date of the event, followed by a list of all the selected seats in sectors one by one, for each seat there is an row/seat number, and regular price, then there is a drop-down menu with all the discounts available to you. From here you can choose different price discount for each selected seat (on the right you can see the final price for the client). At the end of the list is the total price of the whole reservation. After making sure that all the seats are correctly reflected and fair prices, you must enter time of validity for the reservation, after this time the system will automatically remove it, by default was introduced starting time of the event. Other important information you need to enter is the "Description" here is nice to describe for who is this reservation. This field speeds up the process of finding a subsequent reservation because it can be searched for partial match from the list of reservations for the event. Finaly click on the button "Reserve". You will be redirected to the page with details for this already done reservation. If the entire operation has gone smoothly you can go to the schedule through the main menu or return to the general scheme of the event, through the button "To scene grid" at the top of the page.